Amigurumi Little Broccoli Crochet Free Pattern
Hello my visitors who love to knit amigurumi. In this article, I share new amigurumi patterns for you free of charge. To knit free amigurumi patterns, it will be enough to follow the terms I shared for you. You can delight your children with amigurumi toys.
NECESSARY MATERIALS:
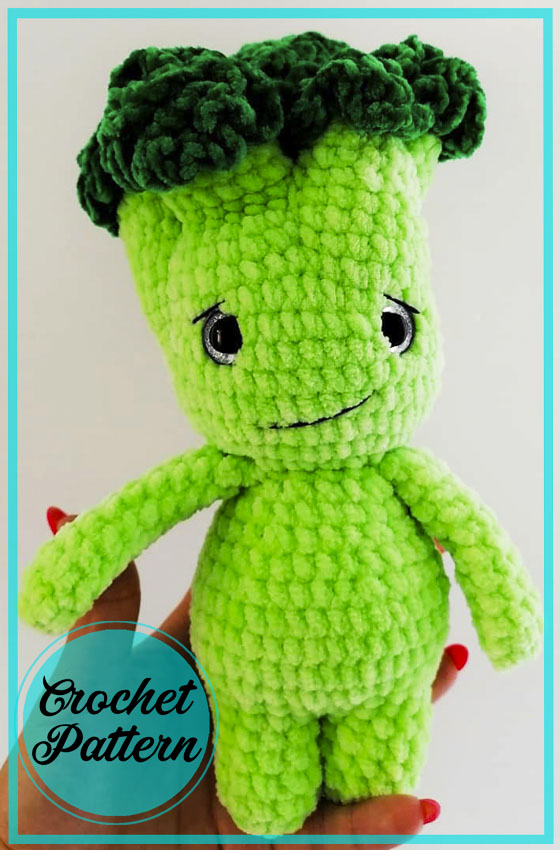
• Yarn HiMALAYA DOLPHIN BABY. You need one skein of basic green and one skein of dark green. My main color is # 350, and I took the dark color from YarnArt Velor # 856
• Hook No. 3.5-4 (you can use any other hook number, respectively, the size and yarn consumption will be different);
• Eyes on a secure mount with a diameter of 16 mm;
• Scissors;
• Filler.
Abbreviations:
AR – Amigurumi Magic ring
MR – Amigurumi Magic ring
App – application
ll – lift loop
sc : Single Crochet
inc : Increase
dec : Decrease
tr : Triple Crochet/ Treble Crochet
st: Stitch
dc : Double Crochet
hdc: Half Double Crochet
sl-st : Slip Stitch
ch : Chain
..in : make increase into same stitch as many as the number which is given in front of “inc” abbreviation (exp; 3inc, 4inc..).
FLO : Crochet into front loops only
BLO : Crochet into back loops only
BL : Bobble Stitch – do 5dc all in the same stitch and then yarn over and pull through all the loops on your hook (the original loop + 1 loop for each partially completed dc).
ZPS
– knitting for the back loop of the column.
CH1
– column with 1 crochet
Arms (2 times):
1) 5 sc in MR
2) inc*5 (10)
3) -5) 3 row 10 sc (10)
6) (3 sc, dec)*2 (8)
7) -11) 5 rows 8 sc (8)
Fold handle in half and knit 4 sc. Fasten and cut the thread
LEGS – BODY – HEAD:
First leg:
1) 6 sc in MR
2) inc*6 (12)
3) -6) 4 row по 12 sc. Cut the thread.
Second leg and body:
1) 6 sc in MR
2) inc*6 (12)
3) -6) 4 row по 12 sc (12)
6) Knit 12 sc on the first leg, return to the second leg and also knit 12 sc (24) Fill the legs a little with filler.
7) (3 sc, inc)*6 (30)
8) (4 sc, inc)*6 (36)
9) -12) 3 row 36 sc (36)
10) (4 sc, dec)*6 (30)
11) 30 sc (30)
12) (3 sc, dec)*6 (24)
13) 24 sc (24)
14) (2 sc, dec)*6 (18)
15) 18 sc (18) In this row we knit handles: 5 sc, 4 sc together with the handle, 4 sc, 4 sc together with the second handle, 1 sc. We fill the body as we knit.
16) From this row, we begin to knit the head immediately: inc * 18 (36)
17) (5 sc, inc)*6 (42)
18) -26) 9 rows of 42 sc. The eyes are inserted between 21 and 22 row, between the peephole approximately 7-8 sc.
Now we begin to knit the twigs, like with real broccoli.
Twig 1:
Knit 2 more sc, cast on 4ch, count back 12 sc and insert crochet at 13 sc. We knit in a circle 3 rows of 17 sc.
We close the top of the twig behind the ZPS:
• 8 sc, dec, 7 sc (16)
• (2 sc, dec) * 4 (12) Next, we make decreases until the end of knitting, not forgetting that we are knitting for ZPS.
Twig 2:
Go back to the left head posts, attach the thread, knit 34 sc in a circle, cast in 5 ch, count back 9 sc and insert the hook into the 10th sc. We knit in a circle 4 rows of 15 sc. We close the ZPS with decreases until the end of knitting.
Twig 3:
It is bifurcated.
Attach the thread to the main knit, knit 10 sc, cast in 7 ch, insert the hook in the middle of ch from the second twig.
We knit in a circle 2 rows of 23 sc.
• 7 sc, cast on 3 ch, count back 9 sc, insert the hook into the 10th sc.
We knit a row behind the ZPS and close it with decreases to the end also behind the ZPS.
• We return to the remaining columns of the twig, attach the thread and knit 3 row. We close behind the ZPS, first alternating (1 sc, dec), then simply by decreasing to the end.
We begin to fill the head and twigs. We try not to stuff too much, so that later we can make tightening.
Twig 4:
Attach the thread to the main knitting, knit 8 sc, cast on 2 ch, join twigs No. 1 and 3 into the joint.
• We knit 2 row (16 sc)
• dec, 7 sc, dec, 5 sc (14 )
• 3 row for 14 sc
• We close knitting with reductions for ZPS
twig 5:
We attach the thread to the remaining sc, fill in the head and twigs, knit 2-3 row and close the knitting with decreases for the ZPS.
Now we take a thread of dark green color.
We attach the thread to the remaining front stitches of the posts and simply knit 5-6 hdc or CH1 in each front st on each twig. I alternated the number and type of columns in a chaotic manner.
Finally, we tighten the base yarn to form more distinct twigs on the head. We introduce the thread into the middle, between the twigs, and draw it along each twig at a different distance (lower or higher) around the head, tightening a little and fixing it immediately at the point of insertion of the thread.
Congratulations