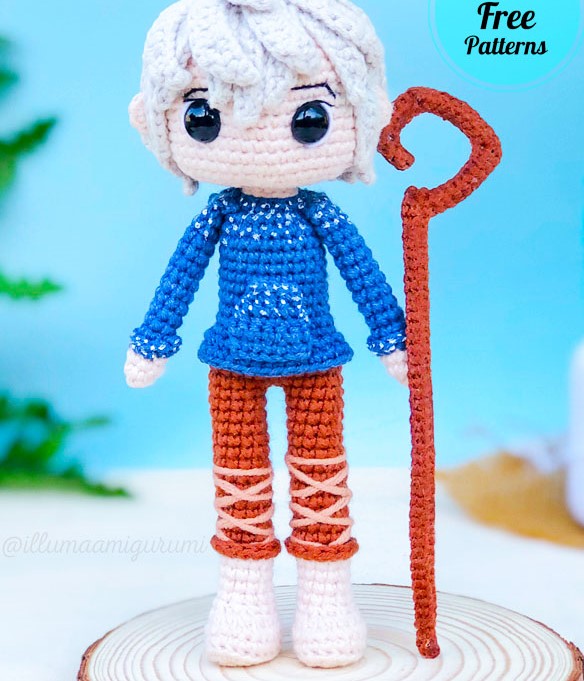
Amigurumi Jack Frost Crochet Doll Pattern
Hello my visitors who love to knit amigurumi. In this article, I share new amigurumi patterns for you free of charge. To knit free amigurumi patterns, it will be enough to follow the terms I shared for you. You can delight your children with amigurumi toys.
Materials:
I used mixed yarn to make Jack (58% cotton and 48% acrylic):
nude for skin
blue for hoodie
brown for pants
gray for hair
light brown for details
Others
needle compatible with wire
needle for sewl
piece of wire or hot glue stick
Safety eyes with lock 10mm
termolina
a piece of plastic for the
feet filling
white fabric ink (optional)
Abbreviations:
sc : Single Crochet
inc : Increase
dec : Decrease
st: Stitch
hdc: Half Double Crochet
sl-st : Slip Stitch
ch : Chain
..in : make increase into same stitch as many as the number which is given in front of “inc” abbreviation (exp; 3inc, 4inc..).
FLO : Crochet into front loops only
BLO : Crochet into back loops only
Legs x2
Start with the nude yarn and make 7 chains:
1. turn back on the second chain and (5sc, 3sc-inc, 4sc, inc) (14)
2. (inc, 4sc, 3inc, 4sc, 2inc) (20)
3. BLO – 20slst
4. BLO – 20sc
5. (4sc, 6dec, 4sc) (14)
Place a piece of plastic from the width of the bottom of the slipper so that it is a straight base, then proceed with the recipe normally:
6. (5sc, 2dec, 5sc) (12)
7 – 10. 12sc (4 rows)
Change to brown yarn:
11. BLO – 12sc
12 – 23. 12sc (12 rows)
Finish the first leg, but not the second.
Before starting the second leg, return to the career left in BLO and do 12sc all around.
Line up the legs by making another 5sc on the second leg, or the amount needed to reach the side, and make 2 chains:
24. (12sc on first leg, 2sc in chains, 12sc on second leg, 2sc in chains) (28)
25 – 27. 28sc (3 rows)
Change to blue yarn:
28. (6sc, dec, 12sc, dec, 6sc) (26)
29. BLO – 26sc
Now stop a little doing the body and make the detail of the second leg that was not even made in the first. Go back in the 11th row left in FLO and do 12pb all around for the finish.
30. (5sc, dec, 11sc, dec, 6sc) (24)
31 – 39. 24sc (9 rows)
40. 12dec
Change to nude yarn:
41. BLO – 12slst
42. BLO – 12sc
43 – 49. 12sc (7 rows)
Place a piece of wire or hot glue stick around your neck so that it is firm and hold your head.
50. 6dec
Close with inverted MR and fast off.
Hoodie Details
With a new blue yarn, insert into the hoodie bar, in the handles left in FLO of row 29.
1. (12sc, inc) x2 (28)
2. 28sc
Fasten off.
Hoodie Pocket
With blue yarn make 7ch and from the 2nd chain:
1. 6sc, 1ch and turn;
2. 6sc, 1ch and turn;
3. (dec, 2sc, dec), 1ch and turn (4)
4. 4sc, 1ch and turn;
5. (1sc, dec, 1sc) (3)
Fasten off.
Stick it on the front of the hoodie.
Hoodie
Before making the initial chains, leave the long thread to the seam of the hood on Jack’s back.
With the blue yarn make 8ch and from the second:
1., 7sc, 1ch and turn;
2. (inc, 5sc, inc) 1ch and turn; (9)
3. (inc, 7sc, inc) 1ch and turn; (11)
4 – 5. 11sc, 1ch and turn; (2 rows)
6. (inc, 9sc, inc) 1ch and turn; (13)
7 – 8. 13sc, 1ch and turn; (2 rows)
Fold in half and sew where we made the last 13sc career.
Then sew on Jack’s back in the last career of the blue hoodie.
Head
Star with nude yarn:
1. MR, 6sc
2. 6inc (12)
3. (1sc, inc) x6 (18)
4. (1sc, inc, 1sc) x6 (24)
5. (3sc, inc) x6 (30)
6. (2sc, inc, 2sc) x6 (36)
7. (5sc, inc) x6 (42)
8. (3sc, inc, 3sc) x6 (48)
9 – 18. 48sc (10 rows)
19. (3sc, dec, 3sc) x6 (42)
20. (5sc, dec) x6 (36)
Put safety eyes between rows 14 and 15.
21. (2sc, dec, 2sc) x6 (30)
22. (3sc, dec) x6 (24)
23. (1sc, dec, 1sc) x6 (18)
24. (2sc, dec, 2sc) x3 (15)
Put filling in the right amount and leave the space in the center of the head for then manage to put the neck extension inside.
25 – 31. 15sc (7 rows)
32. 7dec (8)
Close with inverted magic ring and fasten off.
Expression of Eyes
Make expression in the eyes as in the images below.
I used white and black yarn to make the details of the eyes and eyebrow.
Preferably use a thinner black yarn.
Ears x2
With nude yarn:
1. MR, 6sc (sew ears on the head 4/5sc away from the eyes).
Arms x2
With nude yarn:
1. MR, 8sc
2 – 3. 8sc (2 rows)
Change to blue:
4. BLO – 8sc
5 – 15. sc (11 rows)
Join the two sides and make 4sc.
Now make 8sc with blue yarn at points left in row 4 in FLO.
Sew arms between rows 39 and 40 of the body.
Pants details
Cut a piece of the ligth brown yarn to make the details of Jack’s pants. It’s the braid he’s got as detail.
See the images as a reference.
Opcional
If you want to make the sweatshirt look like there’s snow on Jack’s shoulders, take the white fabric paint and with a pin go making little dots.
Hair
With gray yarn:
1. MR, 6sc
2. 6inc (12)
3. (1sc, inc) x6 (18)
4. BLO – (1sc, inc, 1sc) x6 (24)
5. (3sc, inc) x6 (30)
Now we’ll start the wicks, then make 1slst:
1. 15ch, from the 2nd chain (1slst, 1sc, 12hdc), 1slst
2. 14ch, from the 2nd chain (1slst, 1sc, 11hdc), 1slst
3. 10ch, from the 2nd chain (1slst, 1sc, 7hdc), skip 1 stitch, 1slst
4. 9ch, from the 2nd chain (1slst, 1sc, 6hdc), skip 1 stitch, 1slst
5. 10ch, from the 2nd chain (1slst, 1sc, 7hdc), 1slst
6. 9ch, from the 2nd chain (1slst, 1sc, 6hdc), skip 1 stitch, 1slst
7. 10ch, from the 2nd chain (1slst, 1sc, 7hdc), skip 1 stitch, 1slst
8. 14ch, from the 2nd chain (1slst, 1sc, 11hdc), 1slst
9. 15ch, from the 2nd chain (1slst, 1sc, 12hdc), 1slst
10 – 18. 16ch, from the 2nd chain (1slst, 1sc, 1hdc, 12dc), skip 1 stitch, 1slst
At the last wick we won’t skip any stitch.
Second layer of wicks:
note: this layer will be made “backwards”, the wicks need to be turned with the right side down to give the desired effect on amigurumi.
Take the first point exactly like the photo below (from outside to center), so the wicks will look the way they need to stay.
Hitch a new gray yarn at the last point made in BLO of row 4 and make:
1 – 5. 16ch, from the 2nd chain (1slst, 1sc, 1hdc, 12dc), skip 1 stitch, 1slst
6 – 9. 12ch, from the 2nd chain (1slst, 1sc, 1hdc, 8dc), skip 1 stitch, 1slst
Third layer of wicks:
1. MR, 6sc
Close with 1slst
1 – 6. 8ch, from the 2nd chain (1slst, 1sc, 5hdc), 1slst
Fast off and hide the yarn
Tidying hair
Pin the entire first layer of hair. Wick one is behind Jack’s right ear and wick 9 behind his left ear. Once positioned, glue all the hair.
The second layer of wicks was made “backwards”, so it will look different.
Position and paste as well. The smaller wicks need to be positioned on top of the fringe.
And finally paste the third layer also “backwards”. Then take two wicks on Jack’s right side and glue them over the top to give the tuft effect.
Staff
Start with brown yarn:
Make 25ch and from the second chain:
– 2sc, inc, 4sc, inc, 7sc, 3sc-inc, 8sc (28)
Don’t fast off. Make 46ch more or the amount you find necessary for the height of the staff.
– back on the second chain (45sc)
Fast off and hide the yarn.
You’re going to need to glue the staff so it’s in the right position.
You can dilute some white glue with water and apply with a brush. The same measure of water for the same measure of white glue. Wait for it to dry completely and then remove the pins.
I did this process twice (front and back) to be very firm.
Congratulations
More Amigurumi Doll Ideas