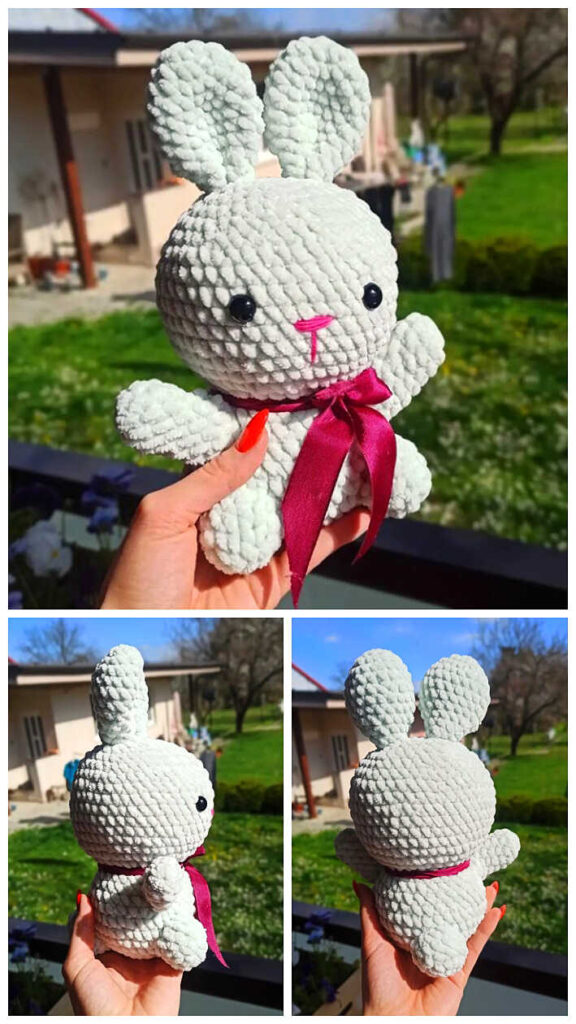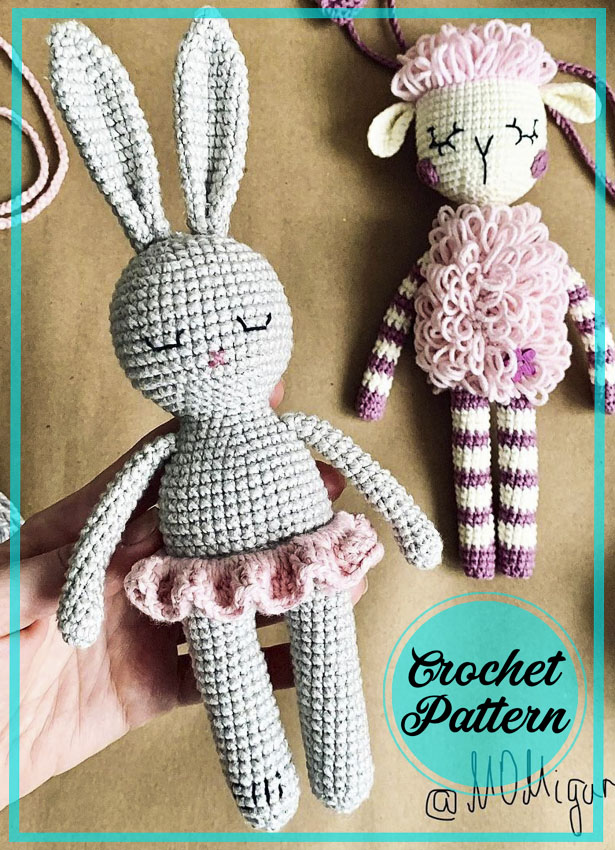
Amigurumi Easy Bunny Crochet Pattern For Beginners
Hello my visitors who love to knit amigurumi. In this article, I share new amigurumi patterns for you free of charge. To knit free amigurumi patterns, it will be enough to follow the terms I shared for you. You can delight your children with amigurumi toys.
You will need:
Fibra Natura Papirus yarn color gray (229-21);
Some pink yarn for the nose and some black yarn for embroidering the eyes; џ Your favorite hook size 2.0;
Knitting needle for eyebrow embroidery and sewing on details;
џ Any filler to your taste (I use holofiber or synthetic fluff, which is available =);
A marker for marking loops (preferably!), If it is not there – not scary, you can mark the end of the row with a thread of a contrasting color;
Scissors;
Inspiration and a couple of cups of hot coffee or cocoa of your choice =)
Abbreviations:
AR – Amigurumi Magic ring
MR – Amigurumi Magic ring
App – application
ll – lift loop
sc : Single Crochet
inc : Increase
dec : Decrease
tr : Triple Crochet/ Treble Crochet
st: Stitch
dc : Double Crochet
hdc: Half Double Crochet
sl-st : Slip Stitch
ch : Chain
..in : make increase into same stitch as many as the number which is given in front of “inc” abbreviation (exp; 3inc, 4inc..).
FLO : Crochet into front loops only
BLO : Crochet into back loops only
BL : Bobble Stitch – do 5dc all in the same stitch and then yarn over and pull through all the loops on your hook (the original loop + 1 loop for each partially completed dc).
Head:
Row 1: 6 sc in MR [6]
Row 2: 6 inc [12]
Row 3:(1 sc, 1 inc)*6 [18]
Row 4:(2 sc, 1 inc)*6 [24]
Row 5:(3 sc, 1 inc)*6 [30]
Row 6:(4 sc, 1 inc)*6 [36]
Row 7: (5 sc, 1 inc)*6 [42]
Rows 8-17: 42 sc [42]
Row 18:(5 sc, 1 dec)*6 [36]
Row 19: (4 sc, 1 dec)*6 [30]
In this step, I am embroidering the eyes between rows 13 and 14, 6 sc between rows Do not forget to embroider the nose as shown in the photo and continue to knit:
Row 20: (3 sc, 1 dec)*6 [24]
Row 21: (2 sc, 1 dec)*6 [18]
At this point, I recommend that you fill the connected part tightly and continue:
Row 22:(1 sc, 1 dec)*6 [12]
Row 23: 6 dec [6]
Cut the thread, fill the head tightly to the end, pass the remaining tail of the thread under the base of all sc of the 23rd row and pull off the hole, fasten the thread.
Sew the ears symmetrically to the spacecraft.
Legs:
Left leg:
Row 1: 6 sc in MR [6]
Row 2: 6 inc [12]
Row 3: (2 sc, 1 inc)*4 [16]
Rows4-23: 16 sc [16]
Just fill your feet tightly with the filler.
Row 24: 15 sc, 1 inc [17]
Row 25: 1 inc, 16 sc [18],make slst, cut and fasten the yarn.
Right leg:
Row 1: 6 sc in MR [6]
Row 2: 6 inc [12]
Row 3: (3 sc, 1 inc)*4 [16]
Rows4-23:16 sc [16]
Just fill your feet tightly with the filler.
Row 24: 15 sc, 1 inc [17]
Row 25: 1 inc, 16 sc [18], we do not cut the yarn, but continue to knit the body:
But, in this case, you do not need to type the chain of ch, but you should immediately switch to the other leg.
Body:
Keeping the right leg in hand, do sc under the last sts on the left leg and continue to knit on the left leg for another 17 sc, then move back to the right and knit 18 sc on the right leg.
This is how we knit the first Row of the body, consisting of 36 sc, with which we connected both legs.
Rows2-13: 36 sc[36]
Stuff the body with filler, especially carefully at the junction of the legs and body.
Row 14:(4 sc, 1 dec)*6 [30]
Row 15: 30 sc [30]
Row 16:(3 sc, 1 dec)*6 [24]
Row 17: (2 sc, 1 dec)*6 [18]
Arms:
2 Times
Row 1: 6 sc in MR [6]
Row 2: (1 sc, 1 inc)*3 [9]
Row 3: 9 sc [9]
Row 4:1 dec, 7 sc [8]
Row 5: 8 sc [8]
Row 6: 1 dec, 6 sc [7]
Rows7-18: 7 sc [7].
We fill with padding polyester tightly at the beginning of the hand and quite a bit along the entire length, then we knit 3 sc through both walls of the hand, or you can simply sew the hole with a needle. We leave the tail of the thread for sewing the hand to the body.
Sew the hands to the 16th row of the body at a distance of 10 sc from each other.
Helpful advice:
If the hole is very narrow for stuffing, you can use regular tweezers.
Ears:
Row 1: 6 sc in MR [6]
Row 2: 6 sc [6]
Row 3: (1 sc, 1inc)*3 [9]
Row 4: (2 sc, 1 inc)*3 [12]
Row 5:12 sc [12]
Row 6:(3 sc, 1 inc)*3 [15]
Rows7-20: 15 sc [15], make slst, cut the yarn, leaving the tail for sewing and sewing to the head.
Congratulations
More Amigurumi Bunny İdeas: