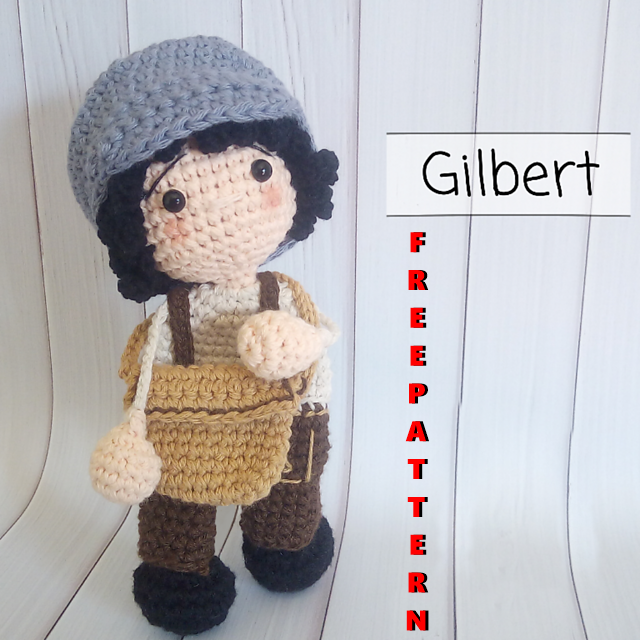
Amigurumi Baby Boy Free Pattern
Hello my visitors who love to knit amigurumi. In this article, I share new amigurumi patterns for you free of charge. To knit free amigurumi patterns, it will be enough to follow the terms I shared for you. You can delight your children with amigurumi toys.
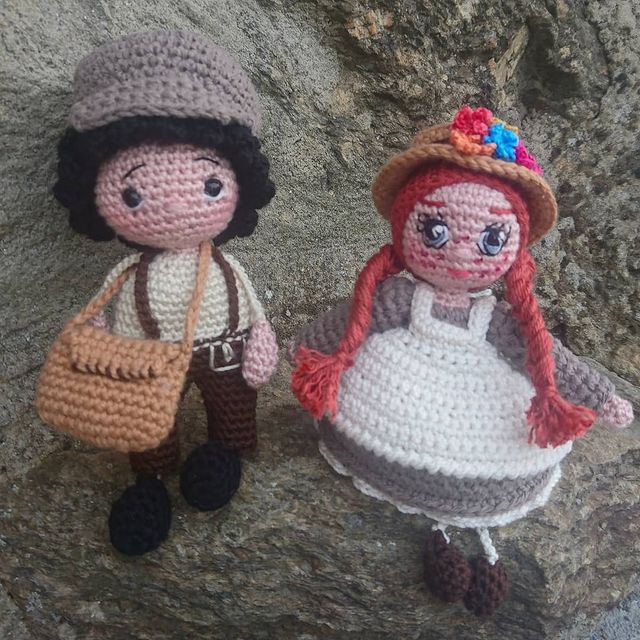
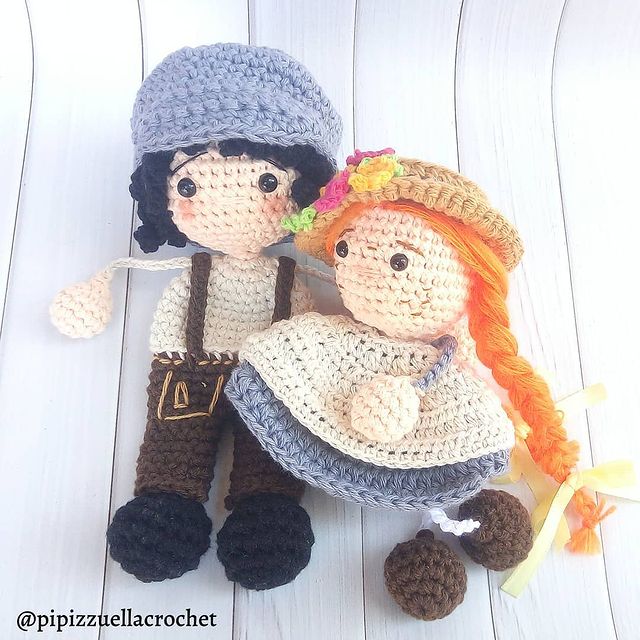
Designer : @pipizzuellacrochet
Ravelry : Maira Tessino
Materials:
Cotton thread used double (color peach, gray, beige, light brown, dark brown and
black)
Crochet hook (2,5 mm, 3 mm and 1,75 mm)
Fiberfill for stuff
Safety eyes
Tapestry needle, stitch marker
Abbreviations:
mr – magic ring
sc – single crochet
inc – increase
dec – decrease
ch – chain
dc: double crochet
FLO – front loop only
BLO – back loop only
Sl st – slip stitch
[ ] repeat work
hdc – half double crochet
( ) number of stitches of the round
dec3 – decrease 3 stitches together
inc3 – increase 3 stitches in the same place
All the pieces are worked in a spiral, otherwise is indicated
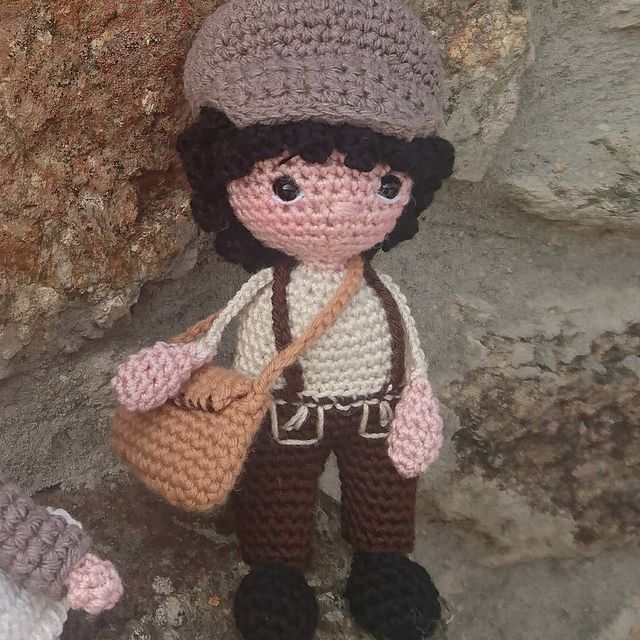
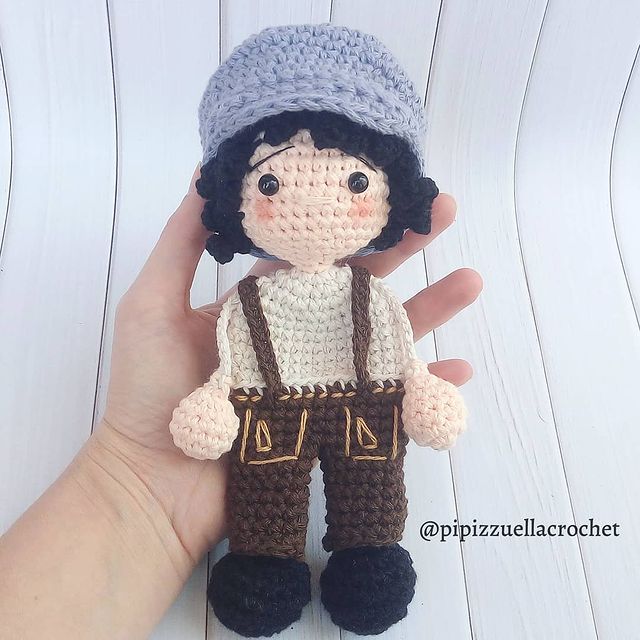
Amigurumi doll free crochet pattern
Arms (make 2)
Start with peach color, hook 2,5 mm.
1) 6 sc in a MR (6)
2) inc x 6 (12)
3) to 5) 12 sc (12)
6) dec x 6 ( 6)
7) dec x 3 (3).
Change to beige yarn and make Ch 11. Cut.
-Sew them to the body, close to the neck.
Legs (make 2)
Start with black color and hook 2,5 mm.
1) 6 sc in a MR (6)
2) inc x 6 (12)
3) 1 sc, 1 inc (18)
4) to 5) 18 sc (18)
6) 1 sc, 1 dec (12)
7) dec x 6 ( 6)
8) dec x 3 (3).
Change to peach yarn and Ch 25. Cut.
-ATTENTION: For inside the shirt, put both
thread into of a tapestry needle and go
through the head to the top part, make a knot.
You should do this before start to crochet the
trousers.
Head
With peach color, hook 2,5 mm
1) 6 sc in a MR (6)
2) inc x 6 (12)
3) 1 sc, 1 inc (18)
4) 2 sc, 1 inc (24)
5) 3 sc, 1 inc (30)
6) 4 sc, 1 inc (36)
7) to 12) 36 sc (36). Put the eyes between
rounds 9 and 10, separated by 6 stitches.
13) 4 sc, 1 dec (30)
14) 3 sc, 1 dec (24)
15) 2 sc, 1 dec (18)
16) 1 sc, 1 dec (12)
17) 6 dec (6).
18) 6 sc (6) Continue with the shirt.
-Embroider the nose and eyebrows.
Shirt
Change to beige color. Working in rows, join
with slst, and start with ch 1 every row.
1) inc x 6 (12)
2) 1 sc, 1 inc (18)
3) 2 sc, 1 inc (24)
4) (11 sc, 1 inc3) x 2 (28)
5) (6 sc, 1 inc) x 4 (32)
6) to 10) 32 sc (32). Change to dark brown.
This is a good moment to put the feet
inside.
Trousers
With dark brown color, working the same
way as the shirt.
1) BLO (6 sc, 1 dec) x 4 (28)
2) to 4) 28 sc (28). Cut.
-Join the thread in the central back. Work
the legs joining with a slst and starting
with ch 1.
***First leg:
1) 14 sc, join in the first st. (put one leg
inside) (14)
2) 12 sc, 1 dec (the decrease goes between
the legs) (13)
3) to 8) 13 sc (13). Cut.
***Second leg: join the thread in the round
4, when we started to crochet the first leg.,
in the center.
1) 14 sc, join in the first st (put the other
leg inside) (14)
2) 1 dec, 12 sc (this decrease goes between
the legs) (13)
3) to 8) 13 sc (13). Cut.
**Embroider the pockets with light brown
color. Also, embroider the waist.
***Suspenders: only 1 thread (not double),
hook 1,75 mm: on the front part, right leg,
join the thread on the first dark brown row,
in the center. Ch 26, cross to the back part,
to the opposite side, join with a slst. Ch 1,
and go back with 26 sc to the beggining.
Join with a slst. Cut and hide the threads.
Repeat for the other suspender.
Backpack
With dark brown, hook 2,5 mm:
1) Ch 8, from the second ch: 6 sc, inc3. On
the other side: 5 sc, 1 inc (16)
2) inc, 5 sc, inc x 3, 5 sc, inc x 2 (22)
3) to 8) 22 sc (22)
**Continue with the cover:
1) BLO 11 sc, turn, ch 1
2) to 5) 11 sc, turn, ch 1. Cut the thread.
**Join the thread on the side. Ch 32, join with
sl st to the other side (you made the belt. Ch 1,
make 32 sl st. Cut and hide the threads.
**With dark brown embroider a detail in the
cover as the picture shows. You can sew both
parts to get a closed backpack or you can sew
a button instead.
Hair
I worked it directly on the head. But if you
want it, you can make first a wig cap (like I did
in my other projects) with black yarn and then
start to crochet the curlers over it. You don’t
need to cut the thread after each row, you can
continue working with the same yarn.
***Only with 1 black thread, hook 2,5 mm, I
will work over the rows of the head, in this
way: (join the thread in the first row):
1) (Ch 6: from the second ch, inc x 5) x 6
2) (Ch 6: from the second ch, inc x 5) x 12
3) Do not work on row 3.
4) (Ch 6: from the second ch, inc x 5) x 24
5) Do not work on row 5.
6) Make curlers every other stitch, only side
to side (up close to the eyes): (Ch 6: from the
second ch, inc x 5).Here you can decide how
many curlers you want.
7) Do not work on row 7.
8) Repeat row 6.
Beret with visor
With gray color, worked double, hook 3 mm:
1) 6 sc in a MR (6)
2) inc x 6 (12)
3) 1 sc, 1 inc (18)
4) 2 sc, 1 inc (24)
5) 3 sc, 1 inc (30)
6) 4 sc, 1 inc (36)
7) 5 sc, 1 inc (42)
8) 5 sc, 1 inc (49)
9) to 10) 49 sc (49)
11) 5 sc, 1 dec (42)
12) 42 sc (42)
13) 5 sc, 1 dec (36)
14) 36 sc (36). Do not cut the thread.
VISOR: both skipped stitch and slst do not
count as a stitch of the row. Turn at the end
of each row.
1) Make 16 sc
2) Skip 1 st, 14 sc, 1 slst (14)
3) Skip 1 st, 12 sc, 1 slst (12)
4) Skip 1 st, 10 sc, 1 slst (10)
5) Skip 1 st, 8 sc, 1 slst (8). Cut the thread.
Join the thread at the back part, make and
edge of sc.
We finished our pattern. You can send the finished pattern to me on facebook, instagram and pinterest.
https://www.facebook.com/amigurumi.sdk.today/
https://www.instagram.com/amigurumifreepatternss/
https://www.pinterest.com/crochetblogkb/
More Amigurumi Baby Ideas