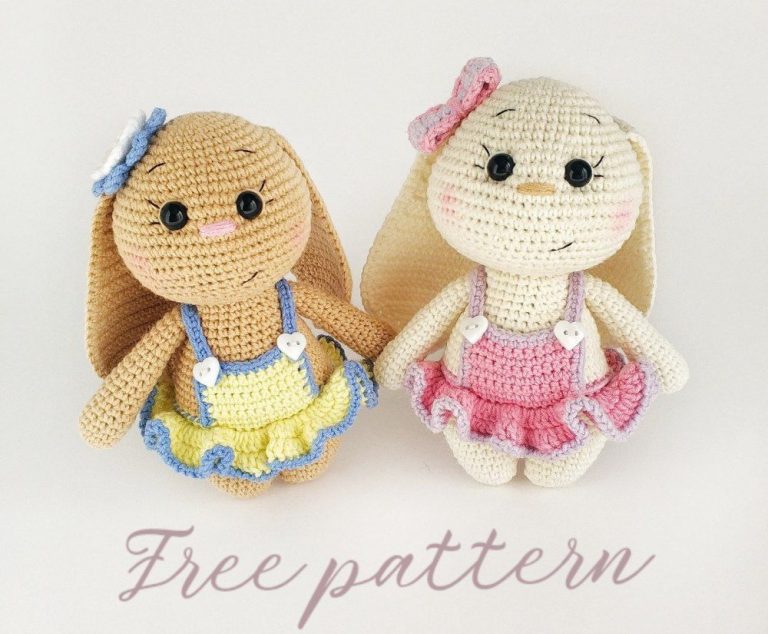
Amigurumi Spring Bunny in Dress Cute Free Pattern
Hello my visitors who love to knit amigurumi. In this article, I share new amigurumi patterns for you free of charge. To knit free amigurumi patterns, it will be enough to follow the terms I shared for you. You can delight your children with amigurumi toys.
Materials:
1. Yarn: YarnArt Jeans ( 50 g/160 m) colour beige №07, colour blue №15, colour yellow № 67;
2. Pink yarn for a nose, white yarn for a flower;
3. Hook 2.00 mm;
4. Fiberfill;
5. Black embroidery floss;
6. Needle and scissors;
7. Safety eyes 10 mm;
9. Ttree buttons for decoration;
10. Dry pastel.
Abbreviations:
R = row
mc = magic circle
ch = chain
sc = single crochet
DC = double crochet
TR = treble crochet
inc = 2 sc in the next stitch
dec = single crochet 2 stitches together
sl st = slip stitch
F.o. = finish off
BLO = back loop only
FLO = front loop only
(12) = number of stitches you should have at the end of the round/row
( ) * 6 = repeat whatever is between the brackets the number of times stated
Arms (make 2)
With beige colour:
R 1: 6 sc in mc (6)
R 2: 6 inc (12)
R 3-7: 12 sc (5 rows)
R 8: (dec, 4 sc)*2 (10)
R 9-13: 10 sc (5 rows)
R 14: (dec, 3 sc)*2 (8)
R 15-20: 8 sc (6 rows)
Fold top of arm flat and 4 sc through both sides across.
F.o.
Legs (make 2)
With beige colour:
R 1: 6 sc in mc (6)
R 2: 6 inc (12)
R 3: (1 sc, inc)*6 (18)
R 4: 18 sc
R 5: 2 dec, 6sc, 2 inc, 6 sc (18)
R 6: 18 sc
R 7: 2 dec, 6 sc, 2 inc, 6 sc (18)
R 8: 18 sc
R 9: 2 dec, 6 sc, 2 inc, 6 sc (18)
R 10: 18 sc
Make 1 sc more on the second leg when you’ll finish R10.
Don’t cut the yarn when you’ll finish the second leg!
Body
R 11: Crochet 6 ch from the second leg and join it with the first leg, 18 sc on first leg, sc in next 6 ch, 18 sc on second leg, sc in next 6 ch (opposite side) (48)
R 12-15: 48 sc (4 rows)
With dress colour (yellow):
R 16: 48 sc
R 17: BLO 48 sc
With beige colour:
R 18: BLO 48 sc
19: 5 sc, (dec, 10 sc)*3, dec, 5 sc (44)
20: 44 sc
21: (9 sc, dec)*4 (40)
22: 40 sc
23: 4 sc, (dec, 8 sc)*3, dec, 4 sc (36)
24: 36 sc
Stuff.
25: (7 sc, dec)*4 (32)
26: 32 sc
27: 3 sc, (dec, 6 sc)*3, dec, 3 sc (28)
28: 28 sc
29: (5 sc, dec)*4 (24)
30: 5 sc, join arm: 4 sc on the first arm and body st, 8 sc, join 2nd arm: 4 sc on the second arm and body st , 3 sc (24)
31: 24 sc
F.o., leaving a long tail. Stuff.
Head
With beige colour:
R 1: 6 sc in mc (6)
R 2: 6 inc (12)
R 3: (1 sc, inc)*6 (18)
R 4: 1 sc, (inc, 2 sc)*5, inc, 1 sc (24)
R 5: (3 sc, inc)*6 (30)
R 6: 2 sc, (inc, 4 sc)*5, inc, 2 sc (36)
R 7: 36 sc
R 8: (5 sc, inc)*6 (42)
R 9: 42 sc
R 10: 3 sc, (inc, 6 sc)*5, inc, 3 sc (48)
R 11: (7 sc, inc)*6 (54)
R 12: 4 sc, (inc, 8 sc)*5, inc, 4 sc (60)
R 13: 60 sc
R 14: (9 sc, inc)*6 (66)
R 15: 5 sc, (inc, 10 sc)*5, inc, 5 sc (72)
R 16-17: 72 sc
R 18: 5 sc, (dec, 10 sc)*5, dec, 5 sc (66)
Insert eyes between R12 and R13, at the distance of 8 stitches from each other.
Or you can make special places for eyes and clue plastic eyes folowing the instruction in this tutorial below (after dress pattern).
R 19: (9 sc, dec)*6 (60)
R 20: 4 sc, (dec, 8 sc)*5, dec, 4 sc (54)
R 21: (7 sc, dec)*6 (48)
R 22: 3 sc, (dec, 6 sc)*5, dec, 3 sc (42)
R 23: (5 sc, dec)*6 (36)
R 24: 2 sc, (dec, 4 sc)*5, dec, 2 sc (30)
R 25: (3 sc, dec)*6 (24)
R 26: 1 sc, (dec, 2 sc)*5, dec, 1 sc (18)
R 27:(1 sc, dec)*6 (12)
R 28: 6 dec (6)
F.o.
Ears (make 2)
With beige colour:
Make 11 ch. From the 2nd ch from hook:
R 1-10: 1 ch, 10 sc, turn (10)
R 11: 1 ch, 1 sc, inc, 6 sc, inc, 1 sc, turn (12)
R 12-14: 1 ch, 12 sc, turn (12)
R 15: 1 ch,1 sc, inc, 8 sc, inc, 1 sc, turn (14)
R 16-18: 1 ch, 14 sc, turn (14)
R 19: 1 ch, 1 sc, inc, 10 sc, inc, 1 sc, turn (16)
R 20-24: 1 ch, 16 sc, turn (16)
R 25: 1 ch, 1 sc, dec, 10 sc, dec, 1 sc, turn (14)
R 26: 1 ch, 1 sc, dec, 8 sc, dec, 1 sc, turn (12)
R 27: 1 ch, 1 sc, dec, 6 sc, dec, 1 sc, turn (10)
R 28: 1 ch, 1 sc, dec, 4 sc, dec, 1 sc, turn (8)
R 29: 1 ch, 1 sc, dec, 2 sc, dec, 1 sc, turn (6)
R 30: 1 ch, 1 sc, 2 dec, 1 sc, turn (4)
R 31: 1 ch, 2 dec, turn (2);
R 32: 1 ch, dec (1).
Make sc around of the ear.
F.o.
Sew the head to the body. Stuff the neck firmly!
Dress
With dress colour (yellow):
Go to the R17 and join the yarn to the last st of R17.
R 1: FLO: 2 ch and 1 DC in one st, (2 DC in one st)* repeat to the end of row, sl st in the second ch.
R 2: 2 ch, 2 DC in one st, ( 1 DC, 2 DC in one st)*47, sl st in the second ch.
With blue colour:
R 3: (1 ch and sl st in one st)* repeat to the end of row.
F.o.
Top dress
Go to the R18.
Join yellow yarn to the 16th st of R18:
R 1: FLO: 1 ch, 12 sc, turn
R 2-5: 1 ch, 12 sc, turn
R 6: 1 ch, 12 sc
F.o.
With blue yarn:
Make sc around of the top dress.
Take blue yarn and needle and follow photos below:
Strap
With blue yarn:
Make 31 ch. From the 2nd ch from hook:
R 1: 30 sc.
F.o., leaving a long tail.
Sew the stap to the dress, decorate with two buttons.
Sew ears to the head:Make places for eyes.
Make point 1 and 2 between R12 and R13, at the distance of 8 stitches from each other.
And point 3 and 4 between R13 and R14, at the distance of 8 stitches from each other.
Take yarn and needle and go: head – point 1 – point 3 – point 2 -pull – point 4 – point 1- pull.
Repeat 2-3 times. F.o.
Flower
With yellow yarn:
R 1: 12 sc in mc (12)
With white yarn:
R 2: (2 ch, 2 DC, 2 ch, sl st)*6
With blue yarn:
Go to the back side. Join yarn to the R1:
R 3: (3 ch, 2 TR, 3 ch, sl st)*6.
Decorate the flower with one button.
Congratulations
More Amigurumi Bunny Ideas:
