Amigurumi Cute Snake Free Pattern
Hello my visitors who love to knit amigurumi. In this article, I share new amigurumi patterns for you free of charge. To knit free amigurumi patterns, it will be enough to follow the terms I shared for you. You can delight your children with amigurumi toys.
MATERIALS
USD3/3.25 crochet hook
Worsted weight yarn ( I used Vanna’s choice)
green (Fern)
cream
orange ( Terracotta)
Yarn needle
6mm safety eyes
black embroidery thread
fiber fill
(optional)polyester pellets/beads
HEAD
Note the placement of eyes and mouth
Rnd 1: 6sc into magic ring
Rnd 2: 2sc into each st [12]
Rnd 3: (sc, inc) repeat around [18]
Rnd 4: sc around [18]
Rnd 5: (2sc, inc) repeat around [24]
Rnd 6: (3sc, inc) repeat around [30]
Rnd 7-10: sc around [30]
Rnd 11: (3sc, dec) repeat around [24]
Rnd 12: (2sc, dec) repeat around [18]
Stuff the head with fiber fill and place the eyes and backings at this point. If you wait until later, the opening of the head will be too small to manipulate the eyes well. Thread your embroidery thread onto your needle and sew the mouth as well, You will want to tie the ends of the mouth inside the head before the opening gets too small.
Rnd 13: (sc, dec) repeat around [12]
Rnd 14: 4sc, dec, 4sc, dec [10]
Fasten off and leave a tail
BODY
Be careful and patient when starting at the tip of the tail! It can be a bit hard to handle because there are so few stitches and everything is so tight together. Do it slowly and carefully and everything will turn out right!
with green yarn
starting out
Rnd 1: 4 st into magic ring
Rnd 2: sc around [4]
Rnd 3: 3sc, inc [5]
Rnd 4: sc around [5]
Rnd 5: 2sc, inc, 2sc [6]
Rnd 6: 2sc, inc, 2sc, inc [8]
with cream yarn
Rnd 7-8: sc around [8]
with orange yarn
Rnd 9: sc around [8]
Rnd 10: 3sc, inc, 4sc [9]
Rnd 11: sc around [9]
with green yarn
Snake body
Rnd 12-13: sc around
Rnd 14: 4sc, inc,4sc [10]
Rnd 15: sc around [10]
with cream yarn
2 rounds straight [10]
with orange yarn
3 rounds straight [10]
4 rounds of green yarn
2 rounds of cream yarn
3 rounds of orange yarn
repeat this stripe pattern 7 times
end with 4 rounds of green yarn
Fasten off
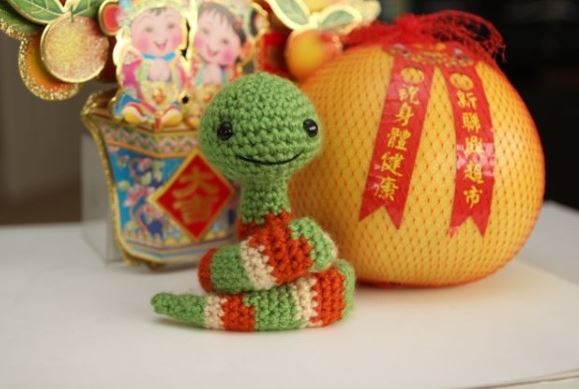
The body doesn’t really need to be stuffed. I started to drop in some polyester pellets but then decided that I didn’t really need them. So in actuality, my snake is partially filled with pellets but it really doesn’t seem to make much of a difference. In fact, if the entire body is stuffed, I don’t think it would be possible to coil and twist it the way I have in order to make it stand up. It’s definitely better to leave it emptier inside. The only part you should stuff is in the neck, where the first green/orange/cream pattern is. After stuffing the neck with a bit of fiber fill, sew the head onto the body. Both openings have 10 stitches each, so it should be a seamless transition. Please refer to my pictures for coiling your snake.
Congratulations
More Amigurumi Snake İdeas :
